Jobs and Schedules
Use the Job Editor to create a new job.
- Open Data Logger from the WebDAQ home page. The Schedule tab opens by default.
- Tap to open the Job Editor. Enter a name for the job, and specify configuration settings using tabs provided:
- Add channels and define channel properties from the Channels tab.
- Specify the sample rate, auto zero mode, and trigger settings from the Acquisition tab.
- Enable logging and configure options from the Logging tab.
- Specify alarm conditions and actions from the Alarms tab.
- Use the Next and Back buttons to move between tabs. Tap Finish to create the job and close the Job Editor. The new job displays in the job list on the Data Logger window.
- Open Data Logger and select the job to modify from the job list.
- Tap to open the Job Editor, populated with the selected job settings.
- Modify job settings as desired, using the options on the tabs provided.
- Tap Finish when done to close the Job Editor and return to the Data Logger window.
Use the Job Editor to edit the settings of a specified job.
- Open Data Logger.
- Tap to open the Job Editor and create a new job.
- Tap and select the job with the channel list to import.
- Configure other job settings, and tap Finish to when done.
Use the Job Editor to import a channel list from one job into a another. This procedure imports a channel list into a new job.
Use the Data Logger to save job settings under a new name.
- Open Data Logger.
- Select a job from the job list and tap to open the Job Editor and create a new job.
- Tap and select the Save To File option under Job.
- Enter a name for the new job. Job settings are saved with the extension *.json.
The new job appears in the job list.
Users can stop one job and trigger the next job in the schedule to run, or stop one job and all remaining jobs in the schedule from running.
- Open Data Logger.
- To stop the currently running job and run the next job in the schedule, select the job from the job list and tap (Stop Job icon).
- To stop the currently running job and cancel all remaining scheduled jobs, tap the Abort button.
Users can run a specific job from the job list on the Data Logger Schedule tab.
- Open Data Logger.
- Select the job from the job list and tap (Run Job icon).
To run all jobs in the schedule, tap the Run All button.
Use the Schedule Settings dialog box to configure schedule repeat settings.
- Open Data Logger.
- Tap to open the Schedule Settings dialog box.
- Under Schedule Repeat Settings, choose how often to run the schedule — consecutively, hourly, daily, weekly, or a custom value.
- Tap OK to save the repeat settings in the schedule.
Use the Data Logger to import schedule settings from a saved schedule file.
- Open Data Logger.
- Tap and select the Import From File option under Schedule.
A dialog prompts for confirmation to replace the existing schedule with the imported file. - Navigate to the location of the schedule file to import. Schedule files are saved with the extension *.json.
The Data Logger Schedule tab updates with the jobs contained in the imported schedule.
Alarms and Events
Use the Job Editor Alarms tab to configure one or more alarms for a specified job. Each channel in the job can be associated with one alarm.
- Open Data Logger.
- From the job list on the Schedule tab, select the job to configure an alarm, and tap to open the Job Editor.
- Tap Alarms and then tap the New tab.
- Under Conditions, select alarm trigger settings. Under Actions, select the action(s) when an alarm occurs.
- Tap Finish to save alarm settings in the job.
To include alarm and event data in one text file, specify the same file name when configuring the Log to File option.
Use the Job Editor Alarms tab to configure an alarm to send an email or text notification when an alarm condition occurs.
- Open the Job Editor Alarms page.
Alarm notifications are configured in the Actions area. - To receive an alarm notification via email, enable Email and enter the email address to send the notification.
- To receive an alarm notification via SMS messaging, enable SMS Message and enter the phone number to send the notification.
- Tap Finish to save alarm settings in the job.
To include alarm and event data in one text file, specify the same file name when configuring the Log to File option.
Refer to the Device window Email/SMS tab for more information about how to set up an SMTP server for email and text notifications.
Use the Job Editor Events tab to enable an event. Up to four event types can be specified for a job. Each event can have up to four actions associated with it that will be executed when the event occurs.
- Open Data Logger.
- From the job list on the Schedule tab, select a job and tap to open the Job Editor.
- Tap Events and then tap the New tab.
- In the Type drop-down list select the type of event to enable.
Users can enable an event when a job starts or stops, when a trigger occurs, or when an error occurs. - Under Actions, select the action(s) when an event occurs.
When an event occurs, users can receive an email or text notification and set the status of a digital bit.
When the event type is Job Stopped the data log file can also be copied or moved to a different location.
Note that the Append Date/Time to File Name logging option must be enabled before the data file can be transferred. - Tap Finish to save event settings in the job.
To include alarm and event data in one text file, specify the same file name when configuring the Log to File option.
Refer to the Job Editor Events tab for more information about event types and actions.
Use the Job Editor Events tab to enable an event and configure it to send an email or text notification when an error condition occurs.
- Open the Job Editor Events page.
Event notifications are configured in the Actions area. - To receive an event notification via email, enable Email and enter the email address to send the notification.
- To receive an event notification via SMS messaging, enable SMS Message and enter the phone number to send the notification.
- Tap Finish to save alarm settings in the job.
Refer to the Device window Email/SMS tab for more information about how to set up an SMTP server for email and text notifications.
Data
Scale channel data to convert a measurement to a more useful value, such as voltage to PSI.
Use the Channel options on the Job Editor to enable scaling. Scaling factors are applied as data is acquired.
- Open Data Logger. The Schedule tab opens by default.
- From the job list, select the job containing the channel data to scale, and tap .
The Job Editor opens, populated with the selected job settings. - From the Channels tab, enable the Custom Scaling checkbox, and enter multiplier and offset values.
- Tap finish to save the settings and close the Job Editor.
Scaling factors are applied when data is acquired.
Users can also enter a custom value in the Units field for supported measurement types.
Use the Data Files window to open and display data files. When the data size of the selected file is greater than the default buffer size, the Data File Range Selector dialog box prompts you to select a range of data to display.
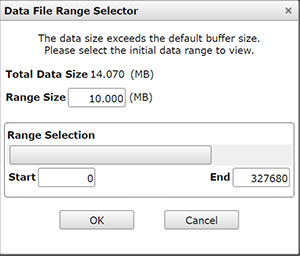
- Open Data Files, and select a data file that is larger than the buffer size.
- Tap .
- The Data File Range Selector dialog box opens for users to enter or select the range of data to plot.
The Display tab opens with the data plotted from the file. - Tap Apply; the Display tab updates with the specified range of data.
Use the Display Options side panel to change the range of samples to plot.
Use the options on the Data Files Display tab to zoom in on strip chart data.
- Open Data Files.
- Open a *.wdd data file from the file list and tap ; the data file opens on the Display tab.
- Tap and draw a border around the data to view, or to zoom in on all of the data.
Use the Data Files window to plot data stored in a file.
- Open Data Files.
- Select a *.wdd data file from the Files tab and tap ; the data file opens on the Data Files Display tab.
Users can also specify a file to open using the File menu on the Display tab.
Use the Job Editor Channels tab to set the color of channel data.
- Open Data Logger.
- Tap to open the Job Editor populated with the setting of the selected job. The Channels tab displays by default.
- Select a channel from the channel list, and choose a color from the color swatch in the Channel Properties panel.
- Open Device.
- Open the Device window Storage tab.
- Tap the Map Drive button to open the Network Storage Folder Properties dialog box.
- Set the folder properties and save the settings.
This dialog box also opens when users create a new network storage folder with the Data Logger Files tab. - Open the Job Editor Logging tab and browse to the shared folder or FTP server as the location to save data acquired data.
Use the Device window Storage tab to first mount a network storage location or FTP server onto the WebDAQ device, and then specify the location to save data with the Job Editor Logging tab.
Depending on the current security level, users may be prompted to enter a password when selecting a mapped network storage location.
Logged data will be saved to the specified mapped network storage location the next time the job is run.
Network and Storage
- Open Data Files.
- Select a file from a WebDAQ storage location or a mapped network storage location.
- Tap , select whether to copy or move the file, and choose the destination location.
Depending on the current security level, users may be prompted to enter a password when selecting a location.
Use the Data Files window Files tab to copy or move one or more files between a WebDAQ storage location and a mapped network storage location.
- Open Data Files.
- Select a folder stored on WebDAQ internal storage or external media and tap Folder Properties to open the Folder Properties dialog box opens.
- Set the read and modify permissions for the admin and/or share users.
Use the Data Files window Files tab to share folders stored on the WebDAQ over a local network and to set folder permissions.
Shared locations and folders on the WebDAQ display on the web page with a shared icon .
Users that set up a shared folder on the WebDAQ and attempt to access it from another computer will be prompted for the share account password. Users that create an FTP server on the WebDAQ and attempt to access it from an FTP client application will be prompted for the share account password. The share password is set on the Device window Security tab.
An "Insufficient disk space" error is returned when the selected storage location is full.
The maximum file capacity of external media formatted with the FAT32 file system is 4 GB. If the log file on FAT32 media exceeds 4 GB, a "File too large" error is returned and the acquisition stops. To acquire a large amount of data to a single file when logging to external media, we recommend reformatting the media using a different file system, such as NTFS, before starting the logging session.
USB drives and SD cards are available formatted with different file systems. WebDAQ supports FAT32, exFAT, ext2/3/4, NTFS file systems. Refer to the table below for key differences between these file systems.
| File System | Maximum File Size |
| FAT32 | 4 GB |
| exFAT | 16 EB |
| NTFS | 16 TB |
| ext2/ext3 | 16 GB to 2 TB |
| ext4 | 16 GB to 16 TB |
Use the file system that best suits your needs:
- FAT32 is not appropriate for high-speed, long term logging, since the file size is limited to 4 GB. FAT32 is the default format of SDHC memory cards.
- When generating large data files, use external media formatted with the exFAT file system. exFAT is the default format of SDXC memory cards.
- exFAT is not ideal when monitoring live data, as performance can be slow.
- Linux requires additional software to access exFAT drives. When running Linux, use external media formatted with NTFS.
- Mac can read NTFS drives, but can't write to them. If you only have a Windows machine, use external media formatted with exFAT or FAT32.
- When using external media only to transfer files using the WebDAQ file download feature, we recommend ext4.
Use the Device page Network tab to manually configure network settings.
- Open Device and tap the Network tab.
- Enter the password when prompted.
- Set the IP Address Type to Static. The default IP Address, Subnet, and Gateway values are enabled.
Using a paper clip, press the CONFIG RESET recessed button on the WebDAQ rear panel to restore the factory default settings.
When pressed, the default factory settings are written to the device and the WebDAQ is rebooted.
Open the Device window Storage tab and tap Eject on the external media panel to unmount.
Users can also press the FUNC button on the WebDAQ rear panel to safely unmount all external media connected to the WebDAQ. Refer to the User Manual for more information about the FUNC button.
Use the Network Storage Folder Properties dialog box to map a network drive or FTP server on the WebDAQ.
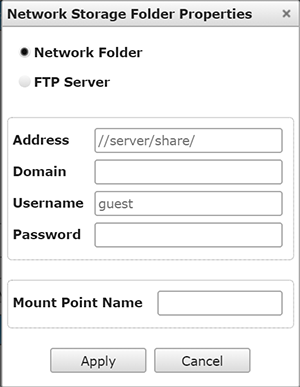
WebDAQ provides two methods to open this dialog box:
- Open the Device window Storage tab and tap the Map Drive button.
- Open the Data Logger Files tab, select Network Storage and tap the New Folder icon. Note that a network drive must already be mounted on the WebDAQ for this storage location to display on the Files tab.
Network folders display on the WebDAQ web interface with a network icon  .
.
WebDAQ Device
Device firmware is bundled with the operating system, web server, and documentation in a software update (*.swu) file. Use the Firmware panel on the Device window Device Info tab to download and install device firmware. Refer to the Updating WebDAQ Firmware topic for instructions.
Use the System Clock panel on the Device Info tab to set the timezone. Note that this value sets the timezone on the WebDAQ hardware, which may be in a different location from the computer or device accessing the hardware.
- Open Device; the Device Info tab displays by default.
- In the System Clock panel, tap the "Change date and time settings"; a Date and Time dialog box opens.
- Select a timezone for the WebDAQ hardware from the drop-down list.
The admin account is used to access the web interface and WebDAQ shared storage locations. The share account is only used to access WebDAQ shared storage locations.
Use the Device window Security tab to set WebDAQ admin and share account passwords. By default, the administrator password is "admin" and the share password is "share".
- Open Device and tap the Security tab.
- Tap the Change Password link in the "admin" or "share" section, and enter the current admin password when prompted; this is required to change both the admin and share passwords. The Change Password dialog box opens when the admin account is verified.
- Enter a new password in the Enter Password field, and again in the Confirm Password field, and tap Submit save the change and write the new password to EEPROM.
Security for shared locations on the device (via SMB or FTP) are controlled separately
Permissions to access a shared folder or FTP server running on the WebDAQ are controlled separately by the Folder Properties dialog box and the FTP Server Configuration dialog box (FTP Server tab), respectively. Users are prompted to enter the share account password when using a different computer to access a shared folder or FTP server created on the WebDAQ.
- Using a paper clip, press the CONFIG RESET recessed button on the WebDAQ rear panel.
When pressed, the following default settings are written to the device and the WebDAQ is rebooted.
Factory default settings
| Parameter | Specification |
| IP address | 192.168.0.101 |
| subnet mask | 255.255.255.0 |
| Gateway | 192.168.0.1 |
| DHCP setting | DHCP + link-local enabled |
| Security level | Off |
| Password for the admin account | admin (case-sensitive) |
| Password for the share account | share (case-sensitive) |
| Device name | webdaq-xxxxxx, where xxxxxx is the last 6 digits of the MAC address (printed on the label on the underside of the device). |
The network settings, security level, user account passwords and device name can be changed with the WebDAQ web interface.
When factory defaults are restored, any shared folders or mapped drives are reset.
Use the Device window Device Info tab to change the device name.
- Open the Device window.
- On the Device Info tab, enter a value in the Name field. A password may be required, depending on the security settings.
- Tap Restart to reboot the device and implement the change.
Restoring the WebDAQ device name to its default setting
To restore the default name of the device, insert a paper clip into the CONFIG RESET recessed button on the WebDAQ rear panel.
When pressed, factory default settings are written to the device and the WebDAQ is rebooted. The default device name is "webdaq-xxxxxx", where xxxxxx is the last 6 digits of the MAC address (printed on the label on the underside of the device).
Use the Data Files window Files tab to delete files from internal device storage or external media.
- Open Data Files; the Files tab opens by default.
- Select the location of the file to delete from the left pane, and the name of the file from the right pane.
Data files have a *.wdd extension, alarm files have a *.txt extension, and both job and schedule configuration files have a *.json extension. - Tapto remove the file from the storage location.